Today was the annual pilgrimage (pilgrims...get it? Thanksgiving--pilgrims..) home to make The Turkeys.
The week before Thanksgiving, I try my best to gather my brood together for our turkey-treat-making-afternoon.
Technically, it is not a pilgrimage,
but the word just sounded so darn good
with turkey-makin'.
The children and I have been making the turkey treats together for over 20 years now. I tried to remember the first year we started this and I think it was 23 years ago. Now that's a lot of turkeys!
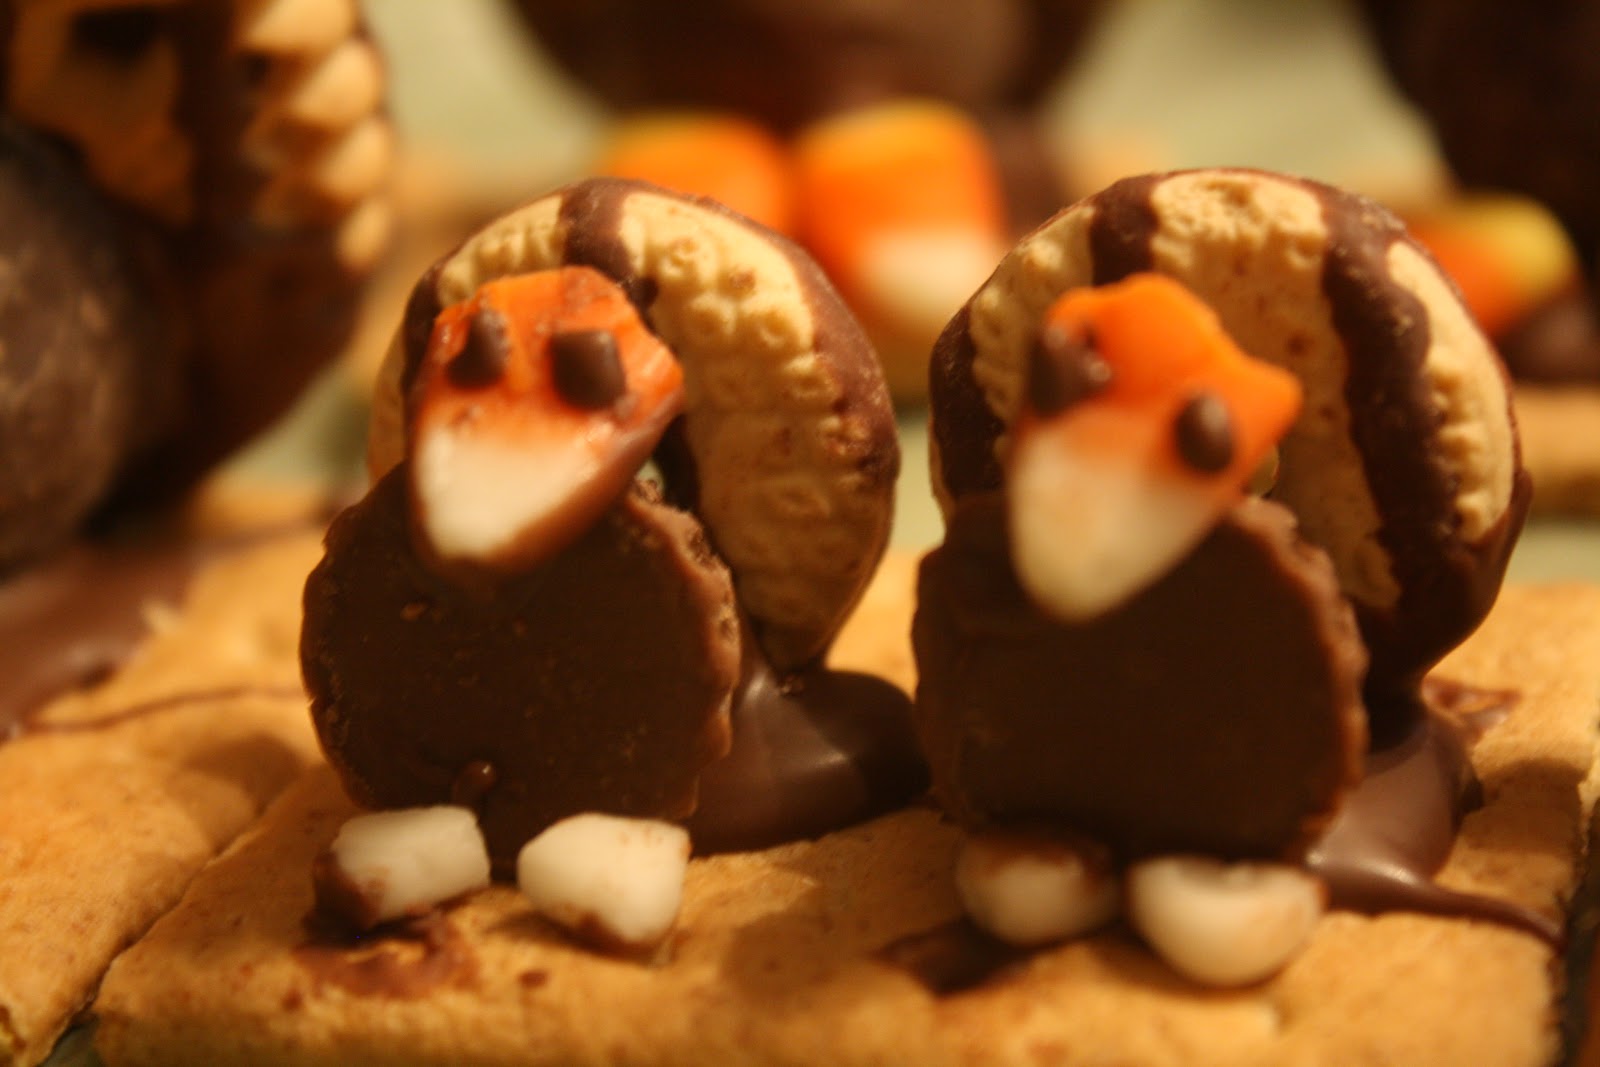
I gathered the supplies (which does NOT include the bananas in the picture). And of course, wouldn't you know it, the creme drops (the turkey body) are not on the table for the picture. So, in your mind, take OUT the bananas and put IN packages of creme drops. Ha!
And while I was shopping the cookie aisle for the turkey "feather" cookies, I spotted the cookies pictured above. They are the exact "feather" cookie we use...only in miniature. Well, with all the new babies we have had in our family this year, I thought we surely needed some turkey babies as well. You will see them in some of the pics. They worked out perfectly.
There are only a few rules for the Turkey-Treat-Makin'-Day: 1. Have fun. Enjoy yourself. Laugh. Have more fun. 2. Make your turkey's look however you want them to look. Don't worry if they are crooked, their feet are backwards, or they have "black" eyes from too much icing, or are "blind" because you forgot to dot their eyes! And 3. Eat as much as you want while you are making them. Eat all the "mistakes" for sure! These rules have sustained us and worked well for 20+ years.
We gather at one of the big tables and everyone has their own "station" with supplies. I learned a long time ago, that it is best to put down plastic when doing this. That "chocolate glue" gets on everything and it takes forever to get off otherwise. I just use the thin plastic you get in the paint department. Works perfect. Believe me, even the adults get messy!
Every year we invite others to join us. We have had cousins and cousins of cousins, friends and in-laws. It was amusing as I posted pictures of today's turkeys on Facebook and Instagram, different people from years past commented, "I remember making those with you!" I loved it! I have learned also through the years to use plastic spoons. It is much easier to throw those away than to clean spoons loaded with chocolate "glue". Everyone also gets a supply of toothpicks (you can see in the corner of the dish) to keep dot their turkey's eyes. (IF they so choose!)

You can see in this picture that each person also had their own bowl of "chocolate glue" (as my kids call it.) Of course, it is actually almond bark. It holds the bodies and heads and feet together instantly. We just kept refreshing the bowls with new "glue" as needed. Having the individual bowls is SO much easier than reaching across the table to share a big bowl. Also, just melting a small amount of almond bark at a time with small children is much better as well.
Sometimes the turkeys get mixed all together and sometimes, like today, each person had something they wanted to do with their own brood. I think there will be a LOT of Turkey Treats at schools and work places on Monday!
Here is the first attempt at the baby turkeys. The creator put two together on a graham cracker. She used bits and pieces from the bottom of the candy corn bucket for the faces and feet. After seeing how well they turned out, we just used a knife to cut the pieces just like that for the rest of the "babies". Aren't they cute? We used mini Reese cups for some of the baby bodies and Hershey drops for some of the baby bodies. Both worked out well. So fun!
You can see this is serious business for some of them! (By the way, we also keep wet wash cloths and dry towels handy for each person. We've got this down to a science, can you tell?!!)
This was little Ebonie's first time to make the turkeys. Caroline (in the blue) is a seasoned-vet, having done this for years with us. She recounted stories about every year she has made them. Little Ebonie asked when she left, "Do you think I can come back to make Christmas turkeys?" Awwwww.
When we were through making them, we packaged them up to go home with each person. I also made plates of turkeys for my neighbors. I wrapped them in cellophane, put a big bow on top and let the girls deliver them to our neighborhood.
Caroline told me when she came back from delivering, that "every single person" loved them. Really. What's not to love?
By the way, to counter-act all the sweetness, we also have supper while we're creating. I just did not take pictures of that. We have homemade pizza and chili and fruit and fun drinks. That too is part of the tradition.
In years past we have also used the turkeys as "place cards" for Thanksgiving dinners, by propping a name card up on their feet. In Kansas I use to make pumpkin rolls for all my friends and I lined up turkeys on top of each pumpkin roll.
There are many possibilities for the turkey trot.


So if you can't tell by the pictures, I'll explain how easy it is. Gather your supplies. Melt your almond bark. Put a big chocolate drop of almond bark on top of a (half) graham cracker. Put two candy corn down on the edge of the chocolate "glue" you just put down. Put the creme drop down behind or on (depending on your creativity) the two candy-corn-feet. Make sure the flat end of the creme drop is "the back". The rounded in goes on the candy corn. Put another dollop of chocolate glue on the bottom half of a turkey. I like to always make sure my feathers (stripes) are going up and down. But then again, that does not matter either. Stick the cookie on the back of the creme drop. Then dip the back of another piece of candy corn in the chocolate glue (just a smidge) and set it on the creme drop for the turkey head. We use a toothpick dipped in the chocolate glue to make the eyes. Sometimes we put a little pumpkin (the candy-corn-kind) beside the turkey. I did not buy any this year and could not find any when I remembered!

At the end of the day, we again have several hundred turkeys....and lots of new memories. The Turkey-Treat-Makin'-Day has just become one of those sweet (very sweet!!!) traditions that has continued through the years and has become part of our annual Thanksgiving rituals. Next year we look forward to including Leightyn, who will be one and half. She will just love it! I can hardly wait to make these again next year!
Linking to: